Chapter 5 Development Practices
5.1 Package Development
If you have functions or code that is used across projects then the best practice is to build a
package. A package combines a set of related functionality which can then be shared easily
between projects and other users. The package devtools makes
package development straight forward. For more detailed information about creating packages, read
the R Packages book or use the cheatsheet below for reference.
NOTE: devtools is currently being split up into smaller packages
and the above book and cheatsheet are slightly out of date.
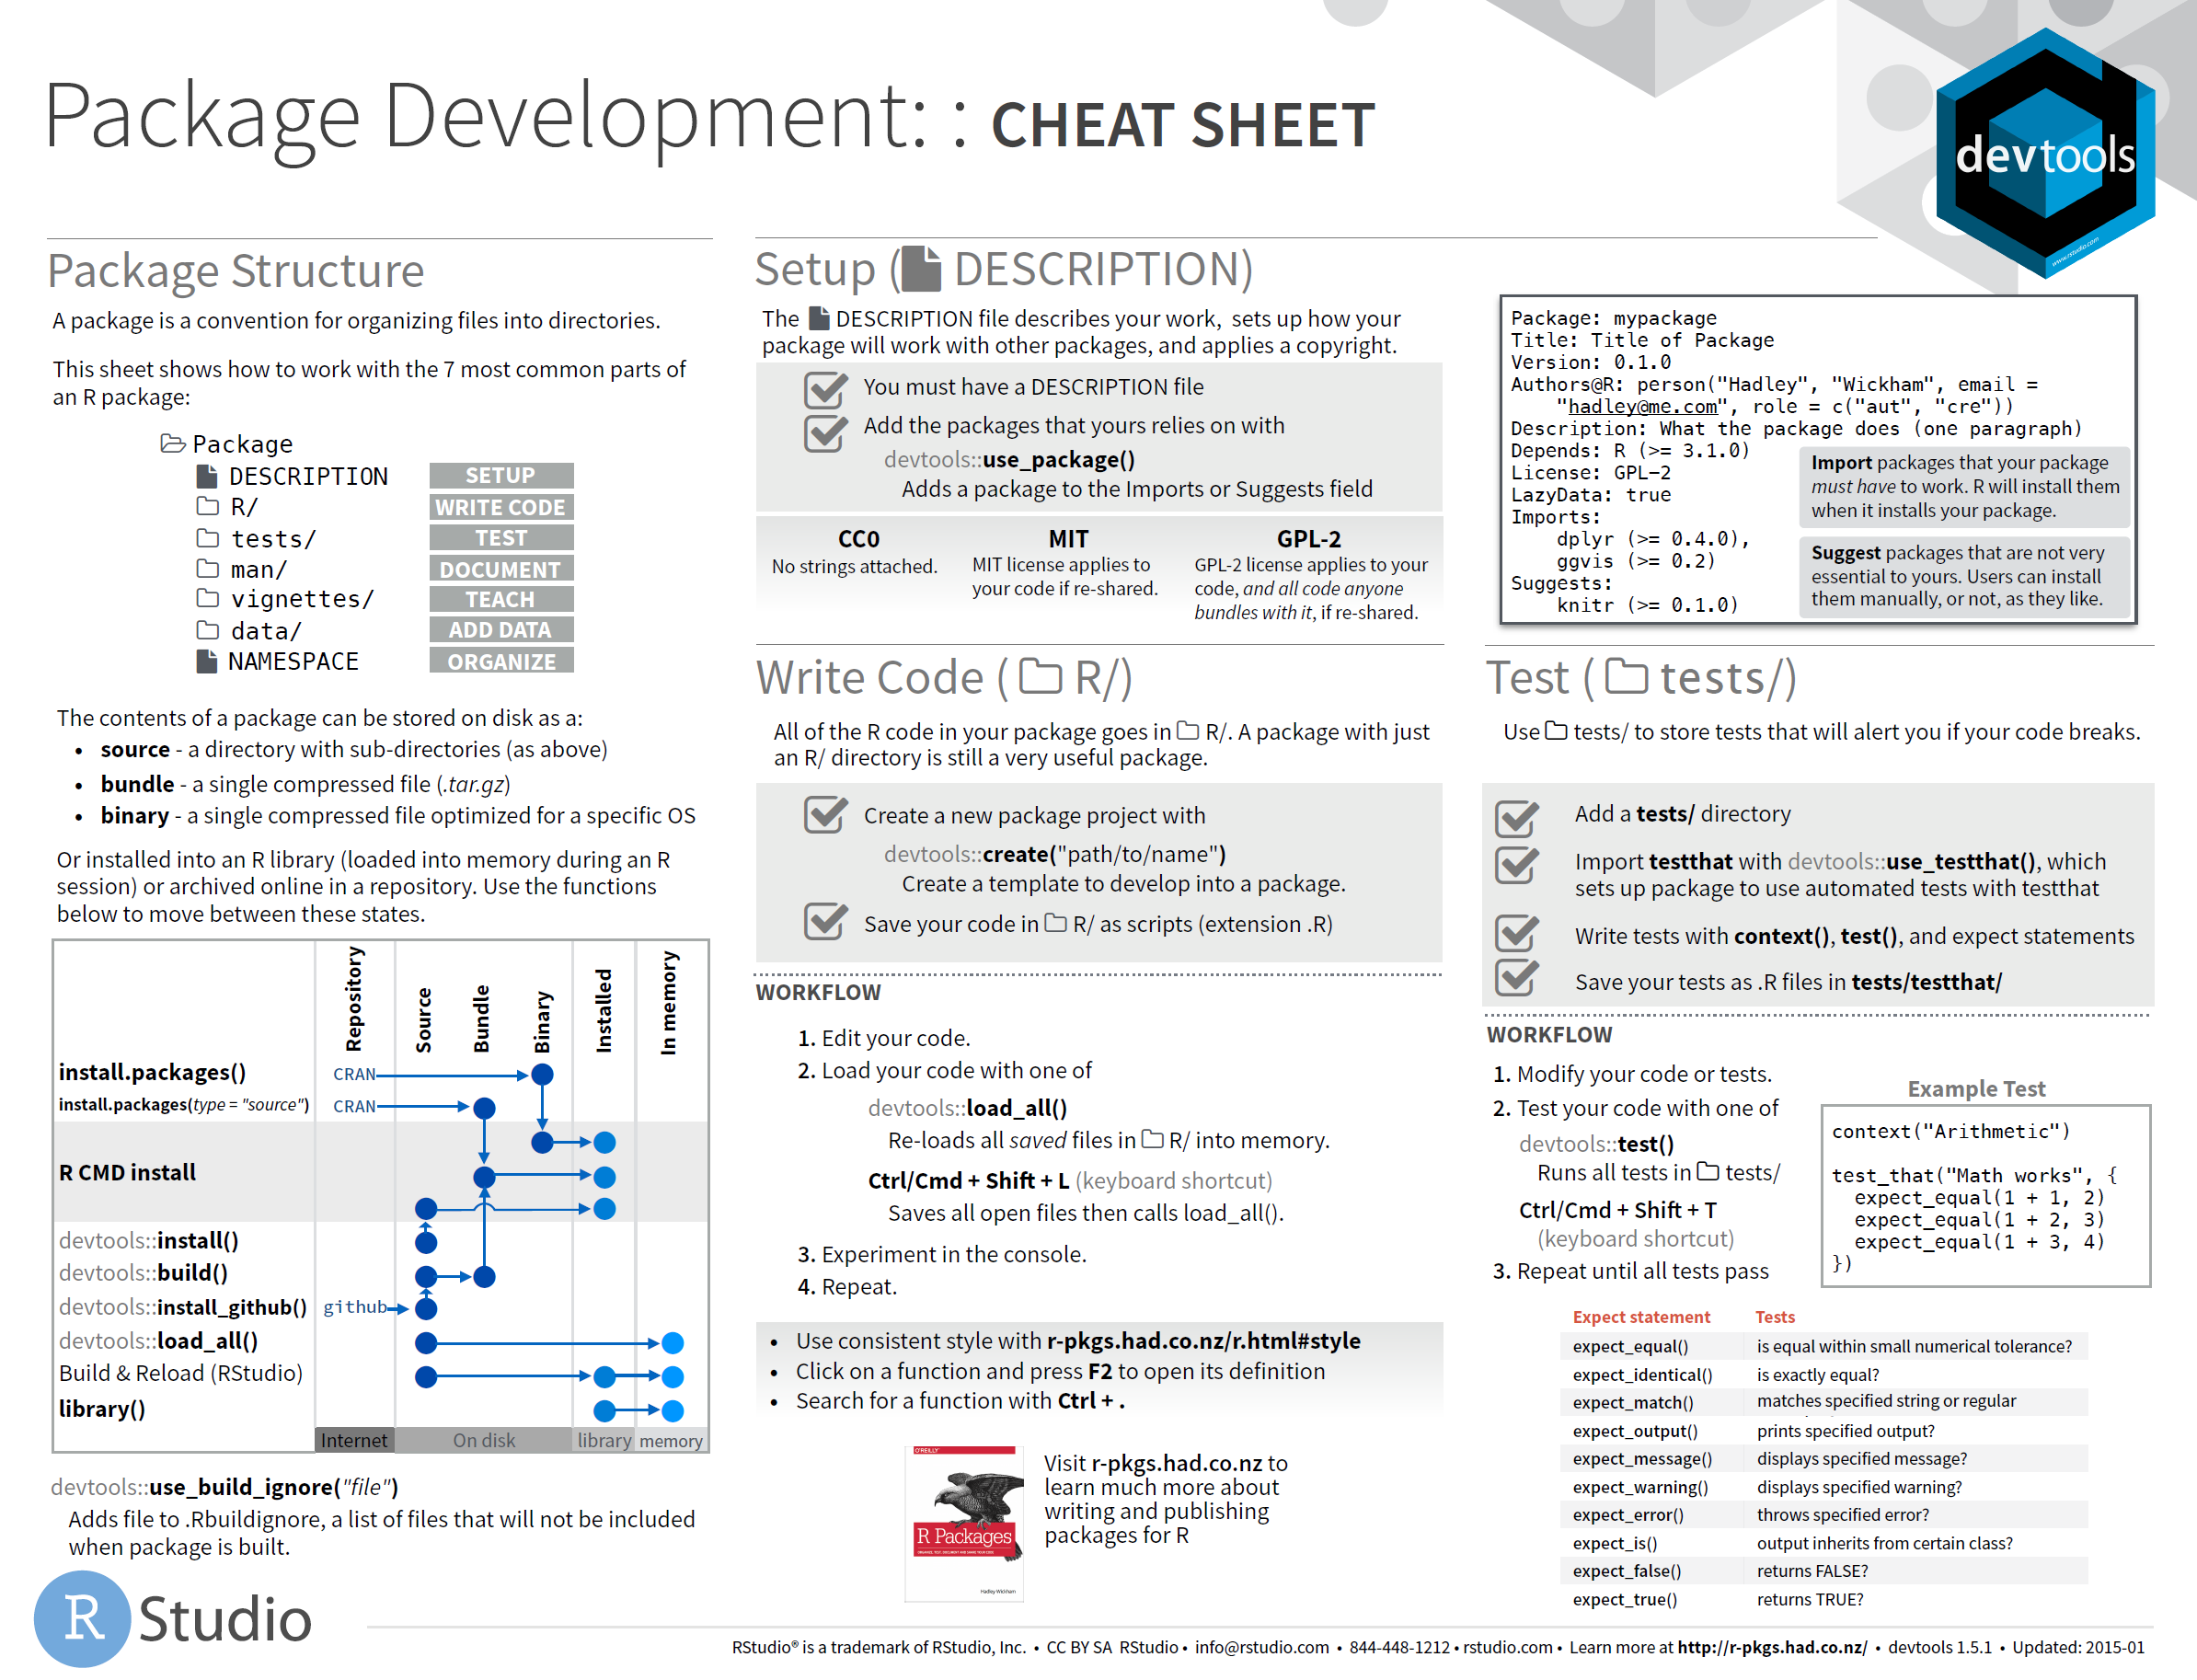
Package development has a formal structure, which addresses many of the areas detailed in the
End-User Computing standards. The package usethis provides
functions to ease the setup of the package structure. To set up an empty package use:
usethis::create_package("pkgname")Functions you wish to add to the package are saved in scripts in the R subfolder that has been
created.
5.1.1 Documentation
Documentation comes in three flavours in an R package. The DESCRIPTION file details the package itself including author and dependencies; help files contains documentation for each function in the package; and vignettes are small articles describing how to use the functions in practice.
5.1.1.1 DESCRIPTION
The function usethis::create_package() creates the basic structure of the package and a
placeholder DESCRIPTION file. You can then edit it manually or use other functions in the
usethis package to update it.
For more detail, read the Package metadata chapter in the R Packages book.
5.1.1.2 Help Files
When writing a function in a package it is good practice to document it, so a user can see how it
works with help("function_name"). Documenting a package is as straight forward as including a
special commented section before the function definition. The package
roxygen2 is then used to convert those
comments into help files.
For more detail, read the Object documentation chapter in the R Packages book.
5.1.1.3 Vignettes
When writing a package, it is also good practice to write a short article explaining how to use
it. If the package is complex it may require a number articles describing different aspects. These
short articles are called vignettes. Vignettes are written in markdown format and stored in a
vignettes subfolder.
For more detail, read the Vignettes chapter in the R Packages book.
5.1.2 Testing
R packages provide a structure for specifying tests that allows you easily re-run all tests and
determine whether something has broken. The package testthat
provides functions for specifying tests and comparing the results with expectations.
For more detail, read the Testing chapter in the R Packages book.
5.2 Version Control
5.2.1 Git
Below is a list of dos and don’ts to help navigate Git.
Do:
- Create a Git repository for every new project
- Always create a new branch for every new feature and bug
- Regularly commit and push changes to the remote branch to avoid loss of work
- Include a gitignore file in your project to avoid unwanted files being committed
- Always commit changes with a concise and useful commit message
- Keep your branch up to date with development branches
- Follow a workflow like Gitflow (expanded on below)
- Always create a pull request for merging changes from one branch to another
- Always create one pull request addressing one issue
- Always review your code once by yourself before creating a pull request
- Have more than one person review a pull request. It’s not necessary, but is a best practice
- Enforce standards by using pull request templates and adding continuous integrations
- Merge changes from the release branch to master after each release
- Tag the master sources after every release
- Delete branches if a feature or bug fix is merged to its intended branches and the branch is no longer required
Don’t:
- Don’t commit directly to the master or development branches
- Don’t hold up work by not committing local branch changes to remote branches
- Don’t commit large files in the repository. This will increase the size of the repository. Use Git LFS for large files
- Don’t create one pull request addressing multiple issues
- Don’t work on multiple issues in the same branch. If a feature is dropped, it will be difficult to revert changes
- Don’t reset a branch without committing/stashing your changes. If you do so, your changes will be lost
- Don’t do a force push until you’re extremely comfortable performing this action
- Don’t modify or delete public history
5.2.2 GitHub Flow
GitHub flow is a lightweight, branch-based workflow that supports teams and projects where deployments are made regularly. It is similar to Git flow but without a develop branch.
- Create a branch
- Add commits
- Open a pull request
- Discuss and review code
- Deploy/Test
- Merge
1. Create a branch
When you’re working on a project, you’re going to have a bunch of different features or ideas in progress at any given time – some of which are ready to go, and others which are not. Branching exists to help you manage this workflow.
When you create a branch in your project, you’re creating an environment where you can try out new ideas. Changes you make on a branch don’t affect the master branch, so you’re free to experiment and commit changes, safe in the knowledge that your branch won’t be merged until it’s ready to be reviewed by someone you’re collaborating with.
2. Add commits
Once your branch has been created, it’s time to start making changes. Whenever you add, edit, or delete a file, you’re making a commit, and adding them to your branch. This process of adding commits keeps track of your progress as you work on a feature branch.
Commits also create a transparent history of your work that others can follow to understand what you’ve done and why. Each commit has an associated commit message, which is a description explaining why a particular change was made. Furthermore, each commit is considered a separate unit of change. This lets you roll back changes if a bug is found, or if you decide to head in a different direction.
3. Open a Pull Request

Pull Requests initiate discussion about your commits. Because they’re tightly integrated with the underlying Git repository, anyone can see exactly what changes would be merged if they accept your request.
You can open a Pull Request at any point during the development process: when you have little or no code but want to share some screenshots or general ideas, when you’re stuck and need help or advice, or when you’re ready for someone to review your work. By using GitHub’s @mention system in your Pull Request message, you can ask for feedback from specific people or teams, whether they’re down the hall or ten time zones away.
4. Discuss and review code
Once a Pull Request has been opened, the person or team reviewing your changes may have questions or comments. Perhaps the coding style doesn’t match project guidelines, the change is missing unit tests, or maybe everything looks great and props are in order. Pull Requests are designed to encourage and capture this type of conversation.
You can also continue to push to your branch in light of discussion and feedback about your commits. If someone comments that you forgot to do something or if there is a bug in the code, you can fix it in your branch and push up the change. GitHub will show your new commits and any additional feedback you may receive in the unified Pull Request view.
5. Deploy/Test
With GitHub, you can deploy from a branch for final testing in production before merging to master.
Once your pull request has been reviewed and the branch passes your tests, you can deploy your changes to verify them in production. If your branch causes issues, you can roll it back by deploying the existing master into production.
6. Merge
Now that your changes have been verified in production, it is time to merge your code into the master branch.
Once merged, Pull Requests preserve a record of the historical changes to your code. Because they’re searchable, they let anyone go back in time to understand why and how a decision was made.
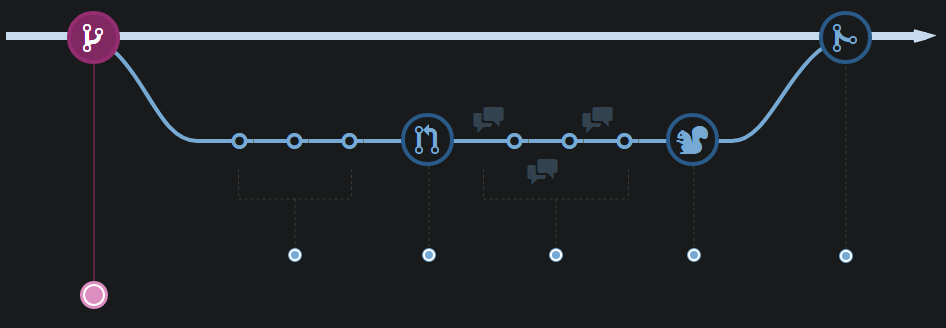
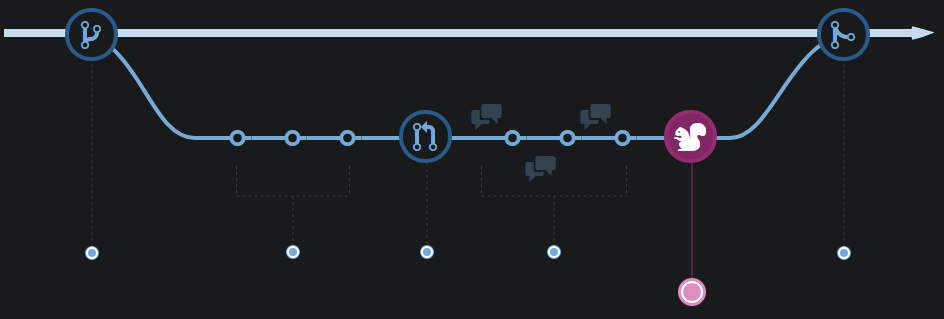
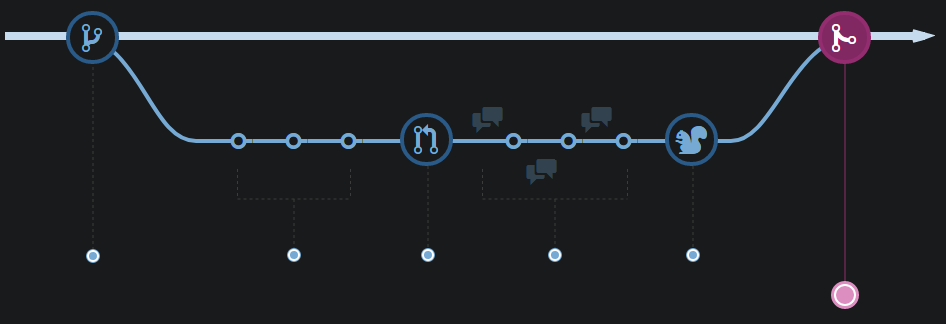
5.2.3 Git Flow
Git flow is similar to GitHub flow, but with the addition of a develop branch.
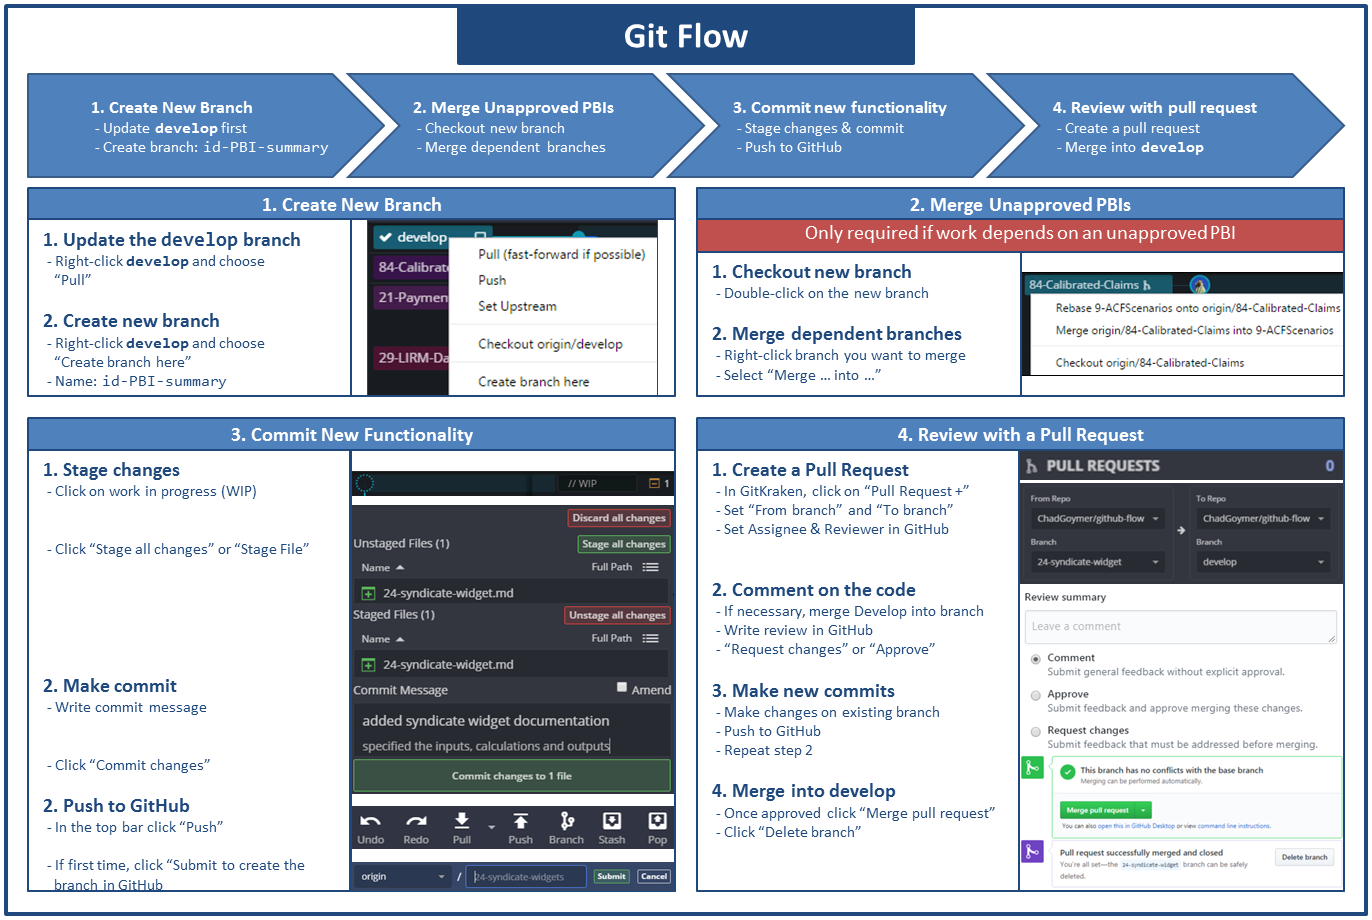
Workflow summary
At a high level the development workflow follows the following steps:
- Create a new branch
- Merge unapproved PBIs (if required)
- Commit new functionality
- Review with a pull request
1. Create a new branch
- Update the
developbranch - Create a new branch:
<issue-id>-<feature-summary>
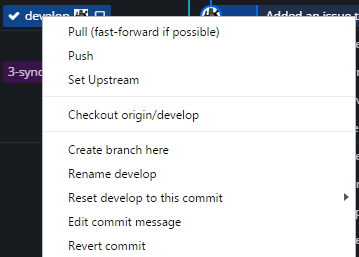
In GitKraken:
- Double-click the
developbranch to check it out:

- Click
Pull:

- Right-click the
developbranch and clickCreate branch here:
- Enter a branch name in the format
<issue-id>-<feature-summary>, e.g.24-syndicate-widget.
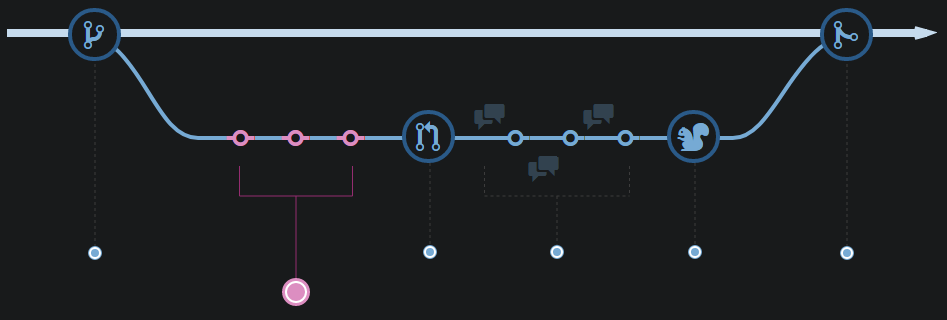
2. Merge unapproved PBIs
Note: This step is only required if your PBI depends on another PBI which has not yet been approved. Since the dependency will not yet exist in the develop branch you will need to bring the changes in separately. This does introduce a risk that the dependency could change while you are developing, but this should be mitigated by merging the develop branch in again once the dependent PBI has been approved.
- Checkout the new branch
- Merge dependent branches
In GitKraken:
- Double-click the branch name to check out
- Right-click the dependent branch name and select
Merge ... into ...

Repeat step 2 for all PBIs the current work depends on.
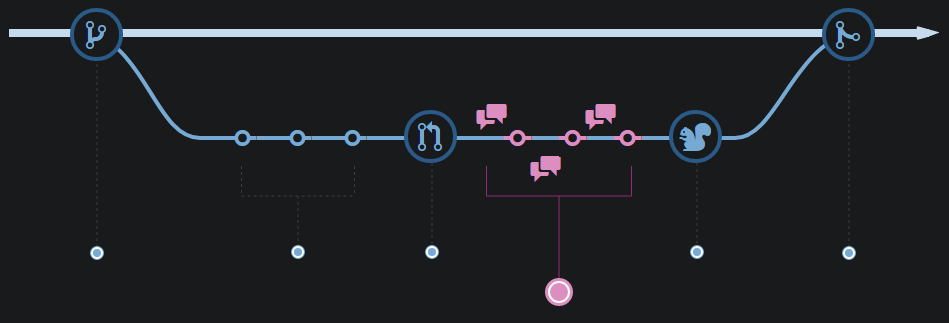
3. Commit new functionality
As the new feature is developed make commits as appropriate. You should make at least separate commits for documentation, tests and code.
For more information about developing new functionality read the wiki pages on Node Documentation, Node Testing, Tyche Coding Standards and Naming Conventions.
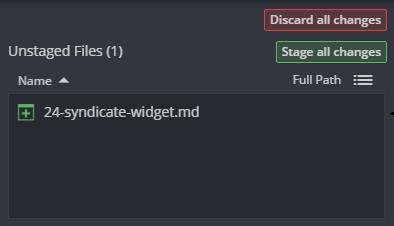
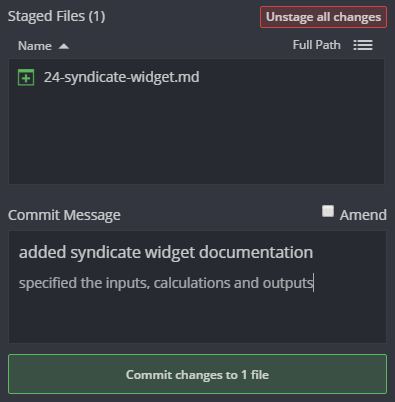
- Stage changes
- Make a commit
- Push to GitHub
In GitKraken:
- Click on the
WIPbar at the top of the central window:

- Click
Stage all changesor stage individual files in the right-hand window:
- Write a commit message and click
Commit changes:
- Click
Pushin the top bar:

- If it is the first time pushing to GitHub from the branch you will have to set the remote branch:

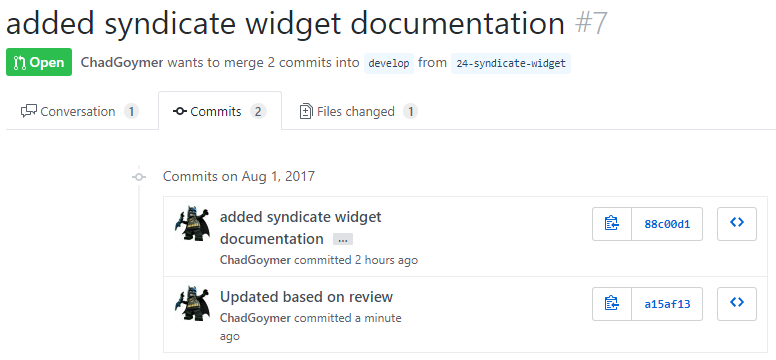
4. Review with a Pull Request
For more information on peer reviewing visit the wiki page Review Process.
- Create a pull request and request someone’s review
- Comment on the code in the pull request
- Make new commits/request changes as appropriate
- Merge into
developwhen complete
In GitKraken:
- In the left-hand window, click on the
+inPULL REQUESTS:

- Set the repository and branch to pull from and the repository and branch to merge into:
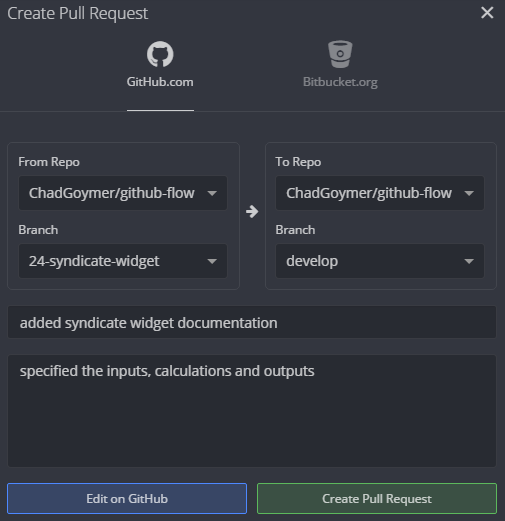
Specify the PBI the feature addresses by writing resolves # in the description (this will also automatically close the issue once merged). You can also request someone’s review by adding @ e.g. @WalkerC.
In GitHub:
- The reviewer comments on the changes and/or requests a change:
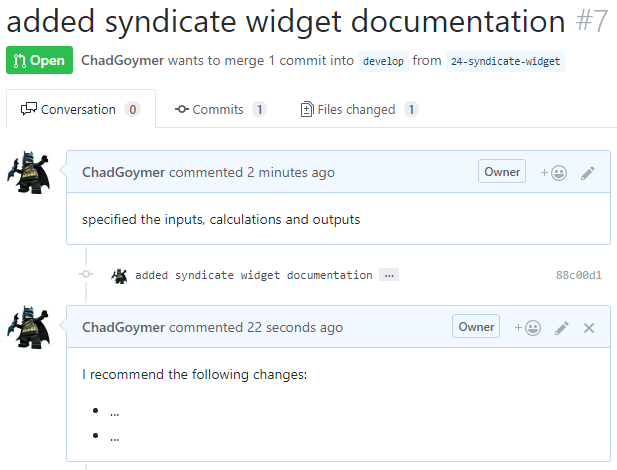
- The developer or reviewer can make new commits as appropriate:
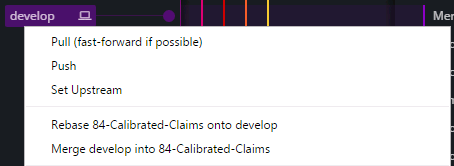
If the develop branch has moved on and you want to test how the current work interacts with a newly published work you can merge the develop branch into the new branch.
Right-click the develop branch and select Merge develop into ...:
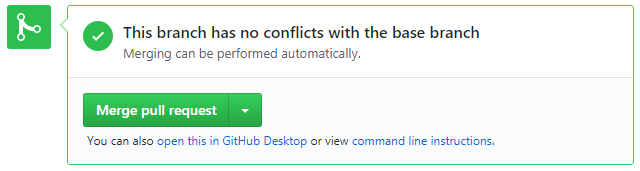
- Once review is complete, click
Merge pull requestand confirm:
- Click
Delete branch:

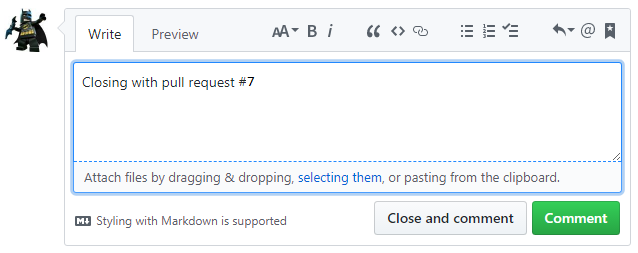
- Close the issue
If you have not used resolves # in the pull request description, you will need to close the issue manually. Go to the issues page of the repository, enter a comment referencing the pull request and click Close and comment:
5.2.4 GitKraken
Commit messages are important, especially since Git tracks your changes and then displays them as commits once they’re pushed to the server. By writing clear commit messages, you can make it easier for other people to follow along and provide feedback. Commit messages like “minor changes” are not helpful and should be avoided, especially in the Data repositories where the commits are viewed by Auditors.
Merge vs. Rebase
There are two ways to integrate changes from one branch into another branch - Merge and Rebase.
The first thing to understand about git rebase is that it solves the same problem as git merge. Both of these commands are designed to integrate changes from one branch into another branch — they just do it in very different ways.
Consider what happens when you start working on a new feature in a dedicated branch, then another team member updates the master branch with new commits.
Now, let’s say that the new commits in master are relevant to the feature that you’re working on. To incorporate the new commits into your feature branch, you have two options: merging or rebasing.
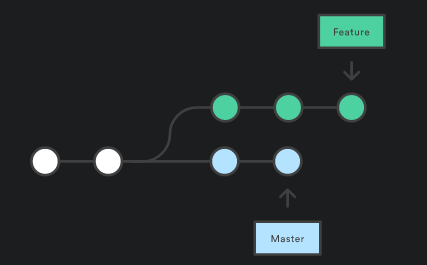
Merge
The easiest option is to merge the master branch into the feature branch.
- Checkout the
featurebranch - Right-click the
featurebranch - Merge
masterinto... - Resolve any conflicts
This will create a merge commit on the feature branch that ties together the histories of both branches.
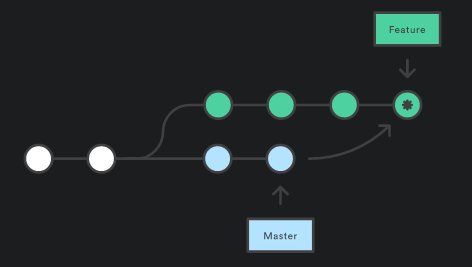
Merging is nice because it’s a non-destructive operation. The existing branches are not changed in any way. This avoids all of the potential pitfalls of rebasing (discussed below).
On the other hand, this also means that the feature branch will have an extraneous merge commit every time you need to incorporate upstream changes. If master is very active, this can pollute your feature branch’s history quite a bit.
Rebase
As an alternative to merging, you can rebase the feature branch onto master.
- Checkout the
featurebranch - Right click the
masterbranch - Rebase
...ontomaster - Resolve any conflicts
This moves the entire feature branch to begin on the tip of the master branch, effectively incorporating all of the new commits in master. But, instead of using a merge commit, rebasing re-writes the project history by creating brand new commits for each commit in the original branch.
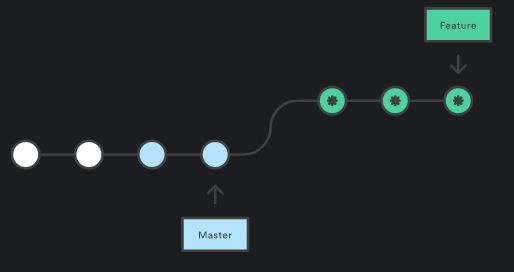
The major benefit of rebasing is that you get a much cleaner project history, it eliminates the unnecessary merge commits required by git merge. You can follow the tip of feature all the way to the beginning of the project without any forks.
The main disadvantage of git rebase is that re-writing project history can be harmful to your collaboration workflow. Rebasing also loses the context provided by a merge commit - you can’t see when upstream changes were incorporated into the feature.